Overview Video
Select the Week
When you open the Time tab, the timesheet defaults to the current week. With the date [<] buttons [>], you can switch to the the previous or next week; you can also click on the date to jump directly to any week.

By default, the week start is Sunday, but your administrator can select any day of the week as the week start day (in tab: Payroll Processor).
The Refresh button re-queries the timesheet entries.
When the time for the week is submitted or approved, you cannot update it, but you can create and submit additional time entries. Your administrator can block entering time, e.g. once it is processed.
Entering Time
The layout if the timesheet might be different from the example. There are various options for your administrator to hide fields or request additional fields. Some fields might also be required.
Time
We maintain time in decimal hours, but you can enter the time in minutes, e.g. "90" or hour:minutes format, e.g. "1:30" or "1h30" - all will be converted to decimal hours, e.g. "1.5". When you enter some time, the line, day and week total is updated. If you do not enter any time, the line is ignored and not saved.
Descriptions
By default, there is a weekly description (255 characters) per line. There is the option to enter descriptions of up to 32,000 characters.
In addition to the weekly description, we have the option to enter descriptions of 255 characters per day - via the "Descriptions" toggle. Your administrator can hide the daily description option - or show and require the daily descriptions when any hours are entered.
Billable
You can overwrite if a line is billable. Your administrator can hide this field if not applicable in your organization. Usually, there is no need to select the value - as it is defaulted from the Project / Line.
Daily Timecard
By default, you see all workdays for the week. When you click on the "Show" toggle, you only see the entries for one day. The date [<] buttons [>] then move the display one day at a time. If you have many entries, this makes it easier to manage/distribute the hours for a particular day.

Weekend Time
The "Weekends" toggle allows to show and enter time on Weekends. Your administrator can hide this option.
Saving Time
After entering time you need to Save it. If you navigate to another week, you will be asked if you want to save the changes first. When you enter time from the Timer or New Time component (or import) the records show here and you could update them here in the Timesheet.
New, Delete and Changes
The [+ New] button adds an additional line to the timesheet.
You can delete saved and new lines via the Delete button. The button is not displayed, if the record is submitted for approval or approved. If you e.g. want to move some hours from a project/line you submitted to another, you could
- Create a line with negative hours with the incorrectly submitted project/line
- Create another line with positive hours and the corrected project/line
Alternatively, you could go to the T+E Report and recall the submitted report. Then, you can go back to the Timesheet and correct the now editable lines and re-submit.
Submitting Time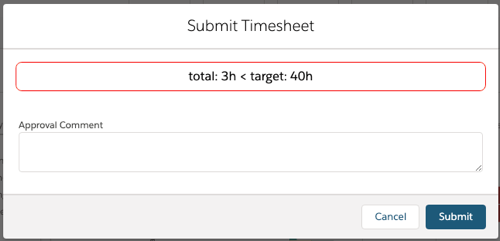
If you are ready to submit the time, click on Submit.
If you submit less than expected, this is displayed in the submit dialog.
Your administrator can setup the system that you cannot submit the time unless you entered the targeted time.
Optionally provide some comments for the approver.
Copying Time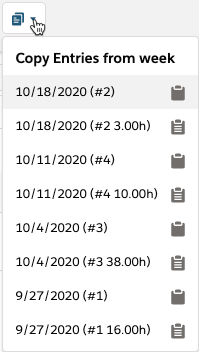
After saving time entries, you can copy them. Click on the Copy icon to display the options. The last 4 weeks are displayed. For every week to copy, you have two options:
- Template - copy just Project and Activity Type - the option shows the week date and the number of entries - e.g. 10/18/2020 (#2)
- Copy - copy also the Hours and Descriptions - the option shows the week date, number of entries and the hours - e.g. 10/18/2020 (#2 3.00h)
When you save, only entries with hours are saved - this allows to copy lines from a previous week and just fill out the items applicable for the week. No need to delete the lines.
Nevertheless, if you copied lines with hours and don't want to save them, you would need to delete the unwanted lines.
By default, only Account, Project, Activity, Hours and Descriptions are copied. If you want to copy additional fields, the administrator can add the fields to be copied in
Setup > Custom Settings - Accorto Settings - Field: Copy Previous Week Fields
example: accorto__Opportunity__c